Before The Avengers, Golden Age was a stagnant and generally uninteresting format. Since The Avengers and JLA after it, the format has gone through several changes. Unfortunately, my experiences with the Faces deck are limited to the pre-JLA Golden Age format. That era of Golden Age is the only one I feel comfortable talking authoritatively about. As our testing was generally narrow (it is easy to be confident against rogue strategies with a rogue weenie strategy), I can only give you narrow advice. Rest assured that many, many hours went into the following paragraphs, and that the advice is sound for wherever you wish to take the deck from here.
Squadron Supreme
There is a widely-held misconception that Faces just runs over the top of Squadron. Unfortunately, this is not the case. In reality, the matchup is initiative-driven, with a substantial advantage going to a player with the odds. However, even then the advantages you gain from being on odds are much more pronounced than what Squadron gets. With the appropriate initiatives, even an average Faces draw will dominate Squadron, whereas even when they have the preferable initiative, they will still need to curve out to beat you. It is just that when they do curve out, you will be hard-pressed to hold them back. As you can’t win every coin flip, I will try to detail the more common scenarios that you will confront in this matchup, as regardless of initiative, you will need to defend stoically and attack ruthlessly.
Squadron can beat you out of nowhere, and you need to be prepared for the worst. Effectively, you are the control player in this matchup, and they are the aggressor. If you can wear them down, your greater resources will win a war of attrition. This is one of the few matchups where you will want to be able to reinforce, though that still doesn’t warrant devoting extra cards to that goal. For this reason, you want to avoid playing the non-Faces guys whenever possible.
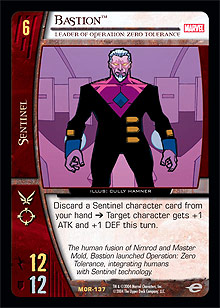
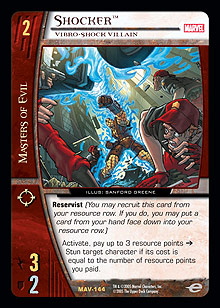 When defending, your trump card is Shocker, but be very careful to ensure that Shocker is going to have a target to stun before searching for him, to the detriment of your later recruits. Contrary to the natural impulse of the deck, Shocker should only be used to drain tempo from the Squadron board, not to stun with the intention of stunning all of their characters later in the turn. The default strategy is to attack at all costs, but for this matchup, your strategy is different.
When attacking, Null Time Zone is invaluable for preventing Panacea Potion. Generally, you want to save it for the turn you plan on winning so that you get the most ATK through to your opponent’s endurance total. However, there are exceptions if you can put together a strong enough third or fourth turn where you know preventing them from playing Potion will make it very hard for you to lose.
Overall, initiatives are crucial, because not only do Golden Archer and Shocker perform better on odd initiatives for their respective teams, but also, both decks have an odd-numbered pivotal turn. Squadron wants to attack on turn 5 with an Other-Earth, taking away half your endurance to go with the other half they presumably already have. You want a strong third turn, where your characters deal substantial endurance loss. From there, Shocker can hold the Squadron deck off on turn 4, and you should be able to clear the dregs out on turn 5, preferably with Speed Demon. The matchup is not as good as it was before the Germans optimized Squadron, but it is still generally favorable all-in-all.
Common Enemy
A surprisingly narrow matchup, Common Enemy is typically draw-dependent, with most of the pressure being on them to get the draw they need. Additionally, whether or not they have System Failure is a prominent feature of this matchup.
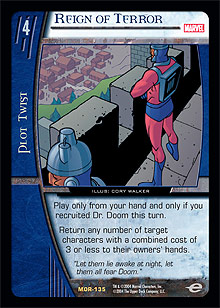 You should absolutely dominate the early game. You really want them to be below 30 coming into turn 4, and that scenario is more likely than you would think at first. Going into turn 4, we enter the first time that Reign of Terror will be available to them. For those not in the know, the Doom player can chain Reign of Terror to Doom’s recruit while the character card is still on the chain, or, in other words, before it comes into play. For this reason, you need to decide before the opposing recruits when to blow your Null Time Zone. Null Time Zone is crucial to this matchup, and you will need to pull out all the stops to get to it.
That said, you have to be smart with how you play it, and not just assume that playing it on turn 4 will win you the game, because if they hold off on Doom and just drop him next turn, you could be in for a world of hurt. The key to knowing how to use the card is to use it only on your initiative. Reign is essentially a reactive card, and given the potentially huge DEF of their turn 3–5 characters, you don’t want to be forced into wasting pumps just to go after their guys and then get bounced. If you Null Reign on their initiative, they will swing in and reduce your numbers anyway, denting your return attack. You need to make sure that when you do use NTZ, you put them at such an endurance total that you know some combination of Ratcatcher and Screaming Mimi will end the game in your favor.
You have to remember that they could have System Failure and Flame Trap, too. Still, you can’t be too cautious, because not only is Thing, The Ever-Lovin’ Blue-Eyed Thing game over for you, a Dr. Doom, Victor Von Doom is probably game as well when backed up by a Doomstadt, some fresh Reigns, and a Mystical Paralysis or something. If they don’t show it to you, play as though they don’t have it until they do. Obviously if you’re lucky enough to have Null Time Zones lying around to spare, play around those cards, but you can’t wait forever.
This matchup is definitely in your favor and only really evens up with System Failure in high circulation. Remember the little things, like not being able to play plot twists from your hand, and the utility characters and you will be well-placed for success.
Teen Titans
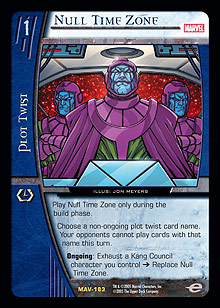 Another matchup where Null Time Zone shines. You were probably surprised the first time you played this and won so easily. However, a seasoned Titans player can probably drag the matchup back to around even if he or she has done a lot of testing, so you will need to pay attention.
In no other matchup is your default plan of attacking relentlessly to ensure a total stun so important. The strength of the Titans anti-weenie strategy is in their numbers, soaking up endurance loss through Heroic Sacrifice and powering out Press the Attack to facilitate Roy and Terra. If you let them have too many characters, they will use Teen Titans Go! to destroy you. Because of this, you must not only stun all of their characters all the time, but you must also find a Null Time Zone.
You need a Null Time Zone to stop Teen Titans Go! and Press the Attack. Typically, when you are on odds, you will be stunning their entire board on turn 3 and will then be vulnerable to TTG! on turn 4. Presuming you can prevent them from team attacking, you should have enough guys to stun their two characters even after they attack. This means that you will prevent Press + Terra/Roy the next turn naturally, and that’s their only way of stopping your offence. However, on evens, you cannot prevent them from recruiting their second, third, and fourth characters on turn 6, so you need to take more drastic measures. You will just have to soak up their fifth-turn team attack and use Null Time Zone to stop Press the Attack (before they recruit the fourth character). I’d like to point out that this line of play stops their best draw; you will roll over their average draw.
Shocker can again feature prominently here, as Hank/Dawn present a unique vulnerability to his ability, really maximizing your potential for counterattack. Speed Demon is not as bad as you think. If the extra resource point (or points) is not too costly, he is worth the investment. You may say that Terra will just stun him, but it is better said that Terra must stun him, which frees up Songbird for the swings.
Finally, it is worth noting that you shouldn’t get cute trying to push through damage against Titans. You don’t want to get too clever trying to play around Heroic Sacrifice and Tamaran in the first few turns. Just stun all of their guys. It doesn’t matter who you lose. The deck has this plan because it can recover so well from its downsides. Send Songbird into Hank—don’t get overexcited and try to save her by sending her into Dawn. Trust me, the other four copies won’t be the only ones patting you on the back when you sign the results slip in your favor.
Avengers
This matchup is deceptively difficult. Generally, it is favorable to the Faces player, but there are several complications that the Avengers player can throw into the works. It is easy to see these features in stages of the early game, mid-game, and late game.
First of all, their ability not only to hit a curve, beginning on the first turn, but also to replay a character on later turns that adds to their board and provides reinforcement, can be a real pain. On a general level, any deck that can curve out against you from turn 1 is going to cause you a lot of problems, as the natural advantages you gain from hitting a 1-drop are negated.
Secondly, their second-rate 2- and 3-drops are amazing against you, particularly if they get the odd initiative. Natasha Romanoff ◊ Black Widow and Quicksilver both allow them to wreak havoc among your weenies, preventing you from effectively swinging back, and buying them time to get to the late game. You are probably the only opponent who is glad to see Dane Whitman and Black Panther hit the table.
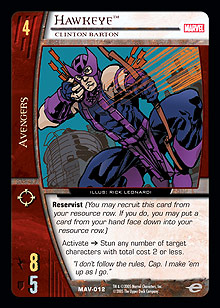 Lastly, their capacity to stun out of combat can dilute your attack to the point where winning becomes very difficult. Hawkeye will always be a problem, and you really have to try to play as many 2-drops as possible in this matchup to lessen his impact. She-Hulk, Gamma Bombshell effectively prevents a significant amount of endurance loss, and if they have odds and get to Wonder Man, it can be extremely difficult for you.
After my observations of their characters, you may be asking yourself how I think this matchup is favorable. Well, for starters, it is unlikely that they will hit the perfect curve to ruin you. Landing recruits on turns 1 to 6 is not easy, and quite often they will miss a crucial aspect of their curve, so take heart.
Hard Sound Construct really shines in this matchup, as your characters are vulnerable to so many stuns that you really need to access the extra recruits Hard Sound Construct provides. Kyle Rayner, Last Green Lantern is thus quite an important target for Beetle.
Fortunately, the Avengers tend to have little in the way of DEF, so you can really get the most out of your attacks and pumps. Clearly, Speed Demon is ridiculous whenever he can be kept safe from Wonder Man, and the addition of Fatality from JLA will help to protect you from Hawkeye’s text. Null Time Zone is only useful for preventing System Failure in this matchup, even if there is a slight chance they can overrun you with pumps.
Curve Sentinels
 When we first began testing for PC: LA 2005, it would surprise none of you that this was the deck we spent most of our time testing. It is amazing how far this deck has fallen since then, and it’s a testament to the overall fall of the Curve archetype in general, with Avengers only slightly more relevant to the current Golden Age metagame.
This matchup depends entirely on the constitution of their deck and how well they draw it. If they miss a part of their early curve, you will normally cause too much endurance loss in the early game for them to stabilize. If they don’t have dedicated anti-weenie cards in their deck, such as Flame Trap or Total Anarchy, they are seriously disadvantaged again.
However, if they do curve out from 1 to 5, the matchup becomes exceedingly difficult. If they do so with Total Anarchy, then it is next to impossible for the Faces player to win. When those things happen, you can’t build up enough of a resource point bank with excess characters to challenge their later curve.
Really, this matchup is as simple as that, and after playing it close to a hundred times, I am glad that it is unlikely to be a feature of the Golden Age metagame again anytime soon.
Child Lock and New School
This category doesn’t include Fantastic Fun and other combat combo decks. Rather, it is restricted to decks that try to win by avoiding combat.
 You are at a distinct advantage against these decks. Firstly, your deck puts them on a clock like no other. Generally, these decks can handle a few potent attackers, typically exhausting them or stalling in a similar fashion. Faces confronts them with a new challenge—you are able to put down so many characters that they cannot counter them all, allowing you to attack cheaply. Secondly, you are able to disrupt them with Null Time Zone and Foxfire, usually buying you a turn and allowing you to ruin their board or pile on the endurance loss. Overall, you have so much gas left in the tank with cards like Shocker and Dallas Riordan, Mayoral Aide able to wreck them randomly, that you should win these games.
It always pays to be on your toes, however, so there are a few things worth remembering. Melissa Gold ◊ Songbird, Sonic Carapace can be a real liability for a change, so you don’t want to play her if you cannot be sure she will be stunned. Additionally, these matches are there for you to lose, so make sure you still plan your attacks and recruits optimally. Sometimes, it can be easy to forget about the counter on Invisible Woman, The Invisible Girl, or that you might need to finish them off with Melissa Gold ◊ Screaming Mimi.
Here ends another Technics series for Metagame.com, and I hope I have been able to give you some sort of feel for the powerful deck that is Faces of Evil. The flexibility and theoretical soundness of the archetype should hold it in good stead in the new metagame, as well as provide a good grounding for how the deck could be built in the new Marvel Modern Age. In concluding this series, I would again like to thank all of the Australian Vs. System players who tested Faces until their fingers bled. As I said at the start of the series, this truly was a labor of love, and the success of the deck would never have occurred without so many willing hands in its development.
Good gaming and good luck!