It’s time for something a little different. Last week, we finished up the main text of the Manual. Don’t worry, there isn’t going to be a test. At the end of the last installment, I asked for players to email me any questions they had about Sealed Pack in general. You did not disappoint me. I got a bunch of really good questions, in fact too many to include them all in today’s article. I decided to take the hardest questions to answer and use them for today’s little FAQ session. And as always, if anyone has a question about something I say here, just email me and I’ll address it right away. On to the goods.
Tim from California sent me the following question:
When it comes to drafting, it seems that forcing a team rather than picking early plot twists is a winning strategy. Have you ever tried forcing before in Draft?
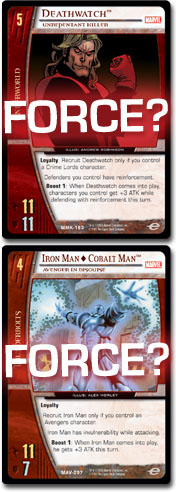 Let me clarify something first. By forcing a team, he means gearing all of your picks to set yourself into a team or combination of teams. He gave examples of Deathwatch and Iron Man ◊ Cobalt Man as characters you could pick to force yourself into a particular set of teams.
This is an interesting question for a couple of reasons. First of all, yes, forcing a team or set of teams is a viable Draft strategy. However, just because it’s viable doesn’t mean that it’s the best way to go. The strategy outlined in the Manual isn’t the only way to Draft; it’s just, in my opinion, the best. The reason I think so is because of its early focus on plot twists. As was said in the Manual, characters come and go, but good plot twists are much rarer. Also, looking at the characters Tim chose to use as examples, I’m fairly certain that Deathwatch was used in the Manual’s discussion of broken characters. If you’ll remember, broken characters are any characters that are incredibly better than any other character at their drop. It could be because of an ability, such as Sinestro, Green Lantern of Korugar’s or Varnae’s. It could also be because of their relative size, as is the case with Deathwatch and Iron Man ◊ Cobalt Man. Broken characters are the only characters I advise picking over good plot twists. So, in essence, picking these guys early in a draft fits in perfectly with the strategy outlined in the Manual.
Where the strategies differ is in their value for the non-broken characters. The Manual’s strategy values them much lower than the average plot twist, while the forcing strategy Tim describes values the characters much higher. It replaces the early plot twist picks with characters of the teams it is trying to force. The main effect it tries to generate is to ensure that you’re solidly in a team. Also, if the players behind you are observant, they will realize what teams are being drafted, and rather than fight with you, they will draft other teams.
There are a few major flaws with this strategy. First of all, you’ll end up with sub-par plot twists. Plot twists make or break most games. In a game where most characters are on par with their counterparts on your opponent’s side, the player with the best plot twists will win. A few good plot twists can even overcome the advantage of having a broken character in play. Secondly, you have no control over the player on your right. It will take that player seven picks to feel the effect of your forcing. Even then, he or she won’t be able to tell it’s your draft strategy that’s affected the pack, since it will be so depleted by the time it gets to him or her. If that player decides to draft the same teams as you, you will end up with a sub par deck. You’ll get the second-best card for your teams in every pack. You will have a positional advantage over that player for the second pack, but that doesn’t make up for the other two packs where you will be at his or her mercy.
One of the major advantages of using the strategy outlined in the Manual is the ability to stay reactive. Since you’re mainly picking plot twists first, you can use your skills to figure out what the players around you are drafting. This will allow you, when you do decide to jump into a team, to pick an underdrafted one and thus avoid the team struggles with your neighbors.
One final note about forcing a team or teams is that some teams almost require you to force them if you wish to play them. X-Statix was one such team. A typical draft could barely support two X-Statix drafters. So, in order to make sure that you were the only player drafting them as a primary team, you really had to start picking their characters much higher than normal. This would take them away from the other potential X-Statix drafters and perhaps force those drafters to look for another team. Manhunters used a similar strategy. They were much more character oriented, though, so their case was a little more extreme; only an exceptional plot twists got picked before a character in that deck. Lastly, the newly released Squadron Supreme usually requires some early picks to be spent on characters; certain characters are essential to the deck’s operation. In order to make sure that you can operate with no hand, characters like Albert Gaines ◊ Nuke and Nighthawk become important for their reservist ability. Skymax also becomes important because you can discard him to empty your hand and then return him on turn 6.
Hopefully, this explains the reasons why I prefer the Manual’s drafting method to the Forcing method. Moving on.
Travis from New York was a little unclear about a subject discussed in parts 2 and 3 of the Manual. He asked:
I don’t understand board advantage at all. Could you please explain it again?
I got more than one email about this subject. I’m really sorry if it was a little unclear in the Manual. Lucky for you, I’ve figured out a much simpler way to explain it.
Most of the endurance loss done to players is done by characters. The bigger the character, the more endurance loss it causes. Therefore, if your characters are bigger than your opponent’s, you should be able to cause more endurance loss than he or she can. You have board advantage when your characters are significantly larger than your opponent’s characters. It’s much easier to figure out whether or not you have board advantage when your opponent is playing a curve deck. You simply compare the characters up the curve. It’s a little more difficult to figure out when your opponent is playing an off-curve deck. It takes some feel to decide who has the advantage. The best way to decide is to figure out how many of each player’s characters would stun during combat.
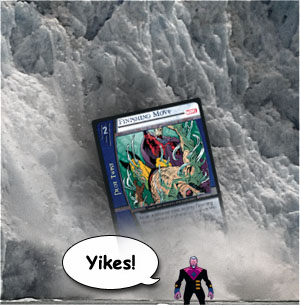 Board advantage is one of the most powerful things a player can have during the game. Having it near the end of the game usually spells victory. This was discussed in the section of the Manual devoted to plot twists. Plot twists that allow you to remove a character from your opponent’s side of the board, be they KO effects like Finishing Move or bounce effects like Sweeping Up, are consequently incredibly powerful. If your opponent doesn’t have a 5-drop on turn 6, it makes your attacks much easier and usually results in less of your characters getting stunned during the attack. This is one of the reasons that board advantage is so powerful. It has a sort of snowball effect. Once you get board advantage, it becomes easier to stun your opponent’s characters and harder for him or her to stun yours. If you’ve ever played a game where your opponent KO’d your largest character, you know what I mean. It’s a really hard hole to climb out of.
Zack from Virginia asked me the following question:
At the end of a recent draft, I found myself with too few 3- and 4-drops in my teams. Earlier in the draft, I picked up a few characters of these costs in another team. Should I play them in my deck to make sure I have the right curve, or should I just stick to my teams?
This is a really good question. I am always of the opinion that having a good curve is much more important than having your characters all share a team. In fact, nearing the end of a draft, I’ve frequently found myself drafting characters of any affiliation simply to fill out my curve. Why it’s so important to have a good curve can be figured out by looking at my answer to the board advantage question. If your curve is not complete, there is a greater chance that you will miss a drop. If you miss a drop, you give your opponent board advantage for free. Hopefully, I’ve explained the concept of board advantage well enough that you understand why this is bad. Because it is.
Well, that’ll do it for me this week. I know I only got to three questions, but most of the other questions I received were a little too specific for me to answer here; the questions I did answer were relevant for everyone who wants to get better at drafting in general. Now it’s time to take all of the things I’ve discussed here and transition to a more specific forum. Next week, I’ll start taking an in-depth look at The Avengers in Sealed Pack. I’ll look at the set as a whole and at individual teams and strategies. Tune in next week to keep the Sealed Pack juices flowing.
As always, if anyone has any questions, I can be reached by email at the_priceis_right@yahoo.com. I really love hearing from you guys! Until next week, you keep drafting, and I’ll keep writing.