
Welcome! How are all my favorite readers doing this week? I am a bit more upbeat than my normal self, so let me tell you why:
Pro Circuit San Francisco was a blast! No matter how many times I attend these events, I always leave feeling satisfied, whether I’m the runner-up, ranked thirtieth, or even if I don’t get a win at all on Day 2. (And yes, all three of those things have happened to me.)
Last week, I gave you an after-the-fact PC preparation guide that I wrote as I got ready to attend Pro Circuit San Francisco. Specifically, I mentioned the deck that I planned on taking to the Pro Circuit. While I did very well for myself (thirtieth overall), Tim Batow surpassed me in excellence. There was a reason I was not the only person picking him for a Top 8 performance, and he did not disappoint. Unfortunately, he took a loss to the eventual PC Champion, who played a deck that was very much like a mirror match. However, even out of disappointment can come joy.
DR. LIGHT AND . . . TIM BATOW?
 I’m not sure how long this has been a tradition, but whenever a member of the Top 8 at the Pro Circuit loses, the winning-challenged individual gets a chance to pick an oversized card of his or her choice. After Tim Batow lost, he picked a card that will likely follow him around the rest of his life: Dr. Light, Master of Holograms. Why would such a card follow him around, do you say? Well, let’s consider some facts:
- Tim Batow is small.
- Dr. Light brings small characters into play.
- Add in an oversized card, and you have a recipe for hilarity.
The night after Day 3, we decided to take full abuse of the great fun that was “activating” Dr. Light to bring Tim Batow “into play.” Tim was in the bathroom getting ready for bed, and Michael Barnes grabbed the oversized card and stood just outside the bathroom. The bathroom was in a hall of the room, so it would appear that when Michael exhausted Dr. Light, Tim would be brought into play. As we tried admirably to restrain our laughter, Tim called out that it was way too quiet. He opened the door and saw Mike holding the oversized card, and we told him we would not let him out of the door unless Dr. Light brought him “into play.” And so Dr. Light exhausted, and Tim Batow emerged, ready for action! Needless to say, we laughed about that all night, and I am here to tell you today that I luckily caught it all on film and may one day treat you with a clip . . . but, alas, that day is not today!
In all seriousness, that story would not be possible without Tim making an amazing performance at the Pro Circuit with an extremely solid deck. In this article, I am going to go through the many decisions an individual faces when contemplating a curve-based deck.
GOALS . . . AGAIN?
I tend to talk about goals when I write these articles; having a focus is vital when optimizing any deck. If your deck tries to do too many things at once, bad things can happen. You may end up accomplishing a couple of goals, but that could be at the cost of efficiency and power. Consistency is important to most pros when developing new decks, and it requires a clear purpose or goal.
The best example I can give of this is the Squadron Supreme deck that I took to the Pro Circuit in Atlanta. That deck was built with one purpose and one purpose only: to smash face. It didn’t care what your opponent did. The deck had no contingency plans if it was to face a certain matchup. It was wall-to-wall aggression. The reason it succeeded was because it was not muddled down trying to do too many things. By maxing out the drops and utilizing cards that played to the deck’s aggressive strengths, we were able to make the deck’s draws consistently predictable and powerful.
HOW DO YOU PICK A GOAL?
Good question. Back in the early days of Vs. System, I believed the game was a simple “I run my guy into your guy” type of game. I have naturally found out that this is not always the case. Sometimes, decks operating on such principles can do well, as I previously explained. Other times, though, you have to think harder and longer and consider concepts other than sending your biggest guy into theirs.
What are some commonly picked goals? Well, obviously a straight combative deck is a popular archetype. Also, there are combo decks, which my team has gained some notoriety for. There are also defensive decks, whose main goals are to brick-wall attacks and then swing back for the win. This was the type of deck that my team decided to take to Pro Circuit San Francisco.
In the end, deciding what goals you want your deck to accomplish will largely depend on the current metagame. If there is a lot of low-curve rush, build a deck that combats that with weenie hate so as to allow an alternative goal, such as a straight aggressive curve. Likewise, in a field dominated by curve builds, an off-curve deck that can get a win quickly and with little liability can capitalize on what is being played.
WHAT’S NEXT?
For Pro Circuit San Francisco, my team decided to go with a curve-based deck that brick-walls attacks. Our next question became, how do we accomplish this goal? Working within Silver Age, our card pool was limited, and we hit the head of the nail on the first try. Here’s the decklist I ran at the PC:
Characters
4 Ahmed Samsarra, White King
4 Bizarro, ME AM BIZARRO #1
4 Connie Webb, Knight
1 Deathstroke the Terminator, Ultimate Assassin
4 Dr. Psycho, Mental Giant
4 Genis-Vell ◊ Photon, Transformed
1 Kang, Kang Cobra
2 Maxwell Lord, Black King
2 Mikado and Mosha, Angels of Destruction
1 Mr. Freeze, Brutal Blizzard
1 Sarge Steel, Knight
1 Ultron ◊ Crimson Cowl, Dark Disguise
Plot Twists
4 Enemy of My Enemy
4 Knightmare Scenario
4 Threat Neutralized
Locations
1 Bizarro World
2 Brother Eye
4 Brother I Satellite
4 Checkmate Safe House
1 Latverian Embassy
1 Phantom Zone
1 Slaughter Swamp
1 The Science Spire
Equipment
4 Knight Armor
Checkmate seemed an obvious choice in helping us achieve our goal. There were several cards that really drew us to the team, and I will share some of those with you in hopes that when you are building your deck and thinking about your goals, similar kinds of cards will catch your eye.
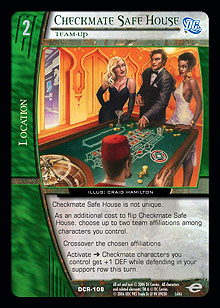 Checkmate Safe House, with its +1 DEF for all support row Checkmate characters for the whole turn, just screamed to be used. It was actually conceivable to get two to three copies in play; that would give all your characters that qualify essentially an ongoing Spider Senses. I know you know that is good!
Knight Armor is just flat-out amazing no matter how you describe it. It gives you an additional +2 DEF while defending, and it practically gives you a From the Shadows while attacking. Being able to give this effect at no cost (as all that is required is for you to control a Checkmate character), this card further validated our feelings that this team was for us.
Knightmare Scenario is one of those plot twists that seemed like a new version of an old card. Remember Army of One from Hellfire Club? I sure do. That card was a pain to deal with and presented a constant threat of bouncing attacks. Well, Knightmare Scenario does the same thing, but it is a little more versatile. First, you can give the bonus to any character, albeit at one half of the intended benefit. Second, there is not a “control only one visible” character restriction.
LYNCHPIN STATUS
Almost every successful deck has a lynchpin. This is that one character that totally sets the pace and often sets up the win condition. Now, don’t get me wrong—this doesn’t mean bomb rare, or what have you. It refers to a card or group of cards that either gets your deck moving or finishes the job.
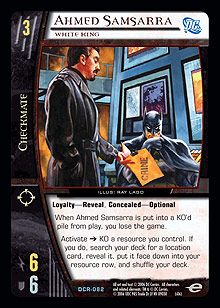 For the deck that we took to the PC, Ahmed Samsarra was the man. He searched out that key location I mentioned earlier, Checkmate Safe House, and could also find any number of other tech locations. However, there was a huge problem. He had this annoying little text in his box that said that whenever he would be put into the KO’d pile from play, we’d lose the game. Well, to be honest, that didn’t scare us. His stats and activated ability were so strong that we knew he would be more of a “win the game” card than a “lose the game” card.
One thing I learned by playing Ahmed, though, was that focusing on a card that furthers your goals also means that you must minimize the cards that exploit the given card’s weaknesses. This is incredibly important. If playing a certain card makes you vulnerable to a certain play, you must determine two things. First, is the benefit that the card provides worth the risk? In Ahmed’s case, we felt it was. Second, is there any way to lessen the impact of the card’s drawback? We were also able to answer this question affirmatively, for the most part. Out of seven players playing the deck at the PC, we played a total 70 matches, and only three were lost due to Ahmed’s King text. (I held the dubious distinction of losing twice to it. If you want more information on that fun experience, check out Ben Seck’s Day 1 blog.)
CHARACTER SELECTION
This section can be considered somewhat obvious, but sometimes it may not be. Just because you know what you want your deck to accomplish does not mean that the characters will jump out of your sleeves, pages, or boxes into your hands. Rather, careful consideration should be paid to the characters that make your deck. Just because a character “seems” like a good fit doesn’t mean that it is.
Merlyn, Deadly Archer is a great example. The way our deck was coming together, it seemed that Merlyn would be right at home. We were playing lots of locations as well as a way to search out locations and fit them into our row. So why didn’t we play him? Well, we did . . . at first. He was in all of our builds in the beginning because of his “obviousness.” Unfortunately, the defensive stance that we wanted the deck to keep was a hard fit for Merlyn. He was only good on our attack step, and even then he was incredibly fragile, as his ability depended on him maintaining a cosmic counter. There were ways to save him—like Rook Control—that we tested briefly, but we felt like we would be losing the focus of the deck if we tried to get too tricky. Thus, eventually, we cut Merlyn.
Let me say this now: just because we cut Merlyn does not mean it is not a good card. On the contrary, Ian Vincent‘s deck abused the crap out of Merlyn for the win. He just did not fit into what we wanted our deck to accomplish. That is the point of this little section. You have to really test what you decide to play. If you know for certain you want your deck to accomplish a certain goal, you may be forced to eliminate a character that could potentially be game breaking in a different (or even similar) deck.
THE DREADED CURVE
This part is really not that hard to figure out. The more drops you play at any given slot, the higher the likelihood you will hit said drop. This obviously changes with the varied search methods available. The more search cards you play (like Enemy of My Enemy or Brother I Satellite), the higher your chances of hitting your desired drops and potentially making your mulligan condition easier to identify.
The standard curve that I normally like to use is as follows:
1-drop: 0-4
2-drop: 4-8
3-drop: 4-6
4-drop: 4-6
5-drop: 4
6-drop: 3-4
7-drop: 1-2
As I mentioned above, running search cards will skew the numbers at each drop, as you don’t need to play as many actual characters when you up the number of plot twist and location effects to search them out.
You also need to consider whether a certain number of characters is needed in your deck to function. Obviously a reservist deck would run infinitely more characters than my team did at PC San Francisco. The goals of each deck will dictate this area of deck construction as well, which further illustrates the importance of knowing the goals of your deck.
ALL THE REST
If you have made it this far with your deck, you likely have slots open. Your characters are set. Your goal-accomplishing cards like Checkmate Safe House are in. Now you have room for tech cards. When determining these last slots, you have to make a judgment call as to whether or not playing techy cards will be a benefit or burden to your deck. This, again, is largely determined by the metagame, where maybe one card is great against one deck and then lousy against all the rest. You, as the master deckbuilder that you are, must make this call. Sometimes you get it right. Sometimes you get it wrong. There is no hard-and-fast rule here, as the face of the metagame can change overnight.
There were cards in our deck that we thought were great metagame calls that I honestly felt we could have done without. For example, Ultron ◊ Crimson Cowl. He was included primarily to deal with Marcus Daniels ◊ Blackout and El Guapo. Unfortunately, as a team, we saw those cards approximately once throughout 70 matches. That slot likely would have been better filled with a card like Sage, Xavier’s Secret Weapon, or maybe Metallo. In the end, finding these last few cards is a guessing game.
IN THE END
I want to thank you for wading through some of the decisions that my team and I made in regard to how to build the deck we played at the PC. Hopefully, you learned a little something about deck construction. I know that I may not have touched on everything, but every deckbuilder has his own personal preferences, and sometimes you just have to go against the grain. All in all, I feel that the blueprint above can get you on your way to developing a strong, focused deck that could make some waves.
You can reach Shane at piercedlawyer@yahoo.com, and he will likely read your email in hopes of finding future deck ideas! Or, he may just answer any questions you may have. It’s anyone’s guess at this point!